13 September 2014

Fontawesome in Photoshop

so mockups can be easily htmlized

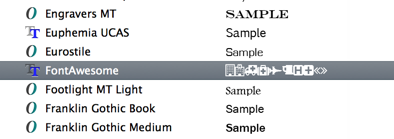
It’s very convenient for front-end developer if you use font awesome icons in your design. To use font awesome in photoshop:

  1. download the zip from https://fontawesome.io/icons
  2. install FontAwesome.otf
  3. go to cheatsheet http://fortawesome.github.io/Font-Awesome/cheatsheet, copy the icon directly
  4. paste in photoshop text layer, you should see a square photoshop 2
  5. choose FontAwesome as the font-face photoshop 2

Again, front-end developers will love you when they get to write the CSS.

12 September 2014

Array_agg

in postgres

When you need to group your data, but you need to know what are these data in these group. array_agg is a convenient aggregation function to help achieve this goal.

For example you want to group books by category, and you need to know which books in the group, this is how we get it.

create table books (
    id serial primary key,
    category text,
    title text
);

insert into books(category, title) values
( 'computer', 'Ruby'),
( 'art', 'Art'),
( 'computer', 'Rails')
;
select category, array_agg(title) as titles from books group by category;
+----------+------------+
| category | title      |
|----------|------------|
| art      | Art        |
| computer | Ruby,Rails |
+----------+------------+

You can play with it on

You could see a columns titles contain a title array in each group.

12 September 2014

History expansion

on the commandline

The exclamation mark ( ! ) has almost been forgot by people who prefer to use arrow keys in their shell (either C Shell, bash, or zsh). Is that possible to be more productive when you use these history expansions? Yeah, YES and NO. But here I’m gonna list out some are really useful.

There are many history expansion features, but at least this one is useful. The !!.

!! is a shortcut for you to re-display the last command you issued. For example,

~$ echo "Testing"
Testing
------------------------------------------------------------
~$ !!
------------------------------------------------------------
~$ echo "Testing"
Testing

But is that faster than Up/Enter? No, but when you need to put something prefix to the previous command, YES. For example, adding sudo before that command is the case.

~$ apt-get install tree
E: Could not open lock file /var/lib/dpkg/lock - open (13: Permission denied)
E: Unable to lock the administration directory (/var/lib/dpkg/), are you root?
------------------------------------------------------------
~$ sudo !!
sudo apt-get install tree
Reading package lists... Done
Building dependency tree
Reading state information... Done
tree is already the newest version.
0 upgraded, 0 newly installed, 0 to remove and 12 not upgraded.

You can use this to repeat a command over and over again. It turns out to be very handy when you need to build a pipeline like this,

~$ netstat -rn
Kernel IP routing table
Destination     Gateway         Genmask         Flags   MSS Window  irtt Iface
0.0.0.0         10.0.2.2        0.0.0.0         UG        0 0          0 eth0
10.0.0.0        0.0.0.0         255.255.255.0   U         0 0          0 eth1
10.0.2.0        0.0.0.0         255.255.255.0   U         0 0          0 eth0
172.17.0.0      0.0.0.0         255.255.0.0     U         0 0          0 docker0
------------------------------------------------------------
~$ !! | grep eth0
netstat -rn | grep eth0
0.0.0.0         10.0.2.2        0.0.0.0         UG        0 0          0 eth0
10.0.2.0        0.0.0.0         255.255.255.0   U         0 0          0 eth0

Not only we can use !!, there are some other ways to use !, such as,

You can repeat a command in history, which starts with a specific string, such as !string. (It not has to be the last command been issued, only ever been issued in history. If there are more than one, you still also can use the arrow keys Up/Down to select them.)

~$ !e
------------------------------------------------------------
~$ echo "Testing"
Testing

Or if you know the number of that command in history, just type !20, for example.

~$ history | grep Testing
 6704* echo "Testing"
------------------------------------------------------------
~$ !6704
------------------------------------------------------------
~$ echo "Testing"
Testing

It’s pretty much enough, in other cases, I will use arrow keys with tab as well. Happy Coding!

12 September 2014

picjumbo

a photo library on mac

I have a nice photo library to share called picjumbo.

It contains high quality photos and they are able for commercial or personal use.

There’s a plugin about picjumbo made by sorece for photoshop http://picjumbo.madebysource.com It’s very convenient but it cost $11,99.

12 September 2014

Photoshop layers

for productive designer

Some basic shortcuts

arrangement  
cmd + [ send backward
cmd + ] send forward
cmd + shift + [ send to back
cmd + shift + ] send to front
option + [ select previous visible layer, add shift to multi-select
option + ] select next visible layer, add shift to multi-select
cmd + g group
cmd + shift + g ungroup
create layer  
cmd + option + shift + n create a new layer without confirm
cmd + j duplicate layers / groups
cmd + shift + j cut selection to a new layer
cmd + e merge selected layer / group, add shift to merge all, add option to get the merged result on a new layer (stamp)
other  
cmd + option + g toggle clipping mask
cmd + delete fill with background color
option + delete fill with foreground color
/ lock layer / group
0 ~ 9 change opacity of layer / group
shift + 0 ~ 9 change layer’s fill opacity

Try to arrange the groups and layers like html dom, the front-end developers will love you.

Some tricks

Remove background

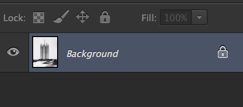
If you want to remove the background of a jpg, when you open it, the transparency is locked by default.

photoshop 1

To unlock it, you can press option and double click the lock icon. Otherwise, If you prefer an alternative way without using mouse, you can cmd + j (copy the current layer), option + [ (select the background layer), and delete it.

Copy layer, but no ‘copy #’

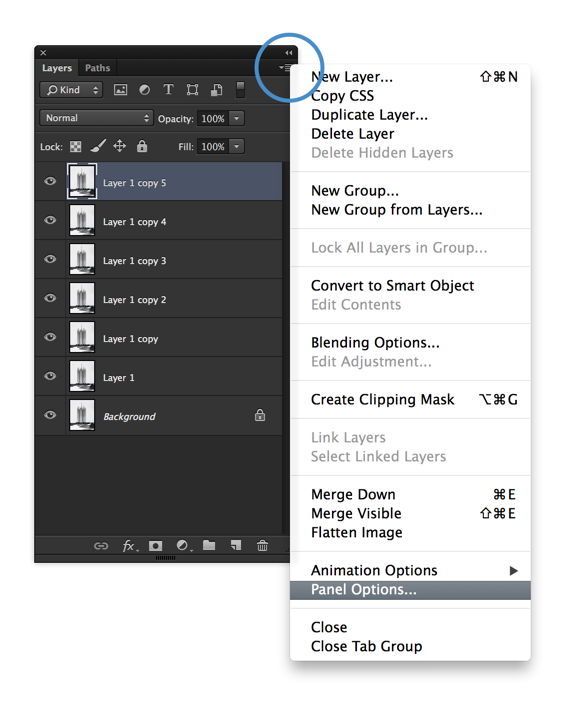
It was annoying me. You can find the setting in “Panel Options…” in the popup menu there is a checkbox - Add “copy” to Copied Layers and Groups

photoshop 2

Rename layer / group

This function has no shortcut, but we can customize it ourself. Open the preference by cmd + option + shift + k and find Layer > Rename Layer…, I set cmd + ctrl + n for it.

photoshop 3

Tools

Export

I recommend Slicy http://macrabbit.com/slicy, a powerful tool to convert .psd to .png, .jpg, .icns, although it’s not fresh.

Advanced

for the advanced designers, I recommend Sketch http://bohemiancoding.com/sketch. This is better than photoshop or illustrator in some features.

11 September 2014

Explain shell

to reach enlightenment

As a developer, programmer, devops or whatever, you are faced to some “magic” shell command from time to time.

Generally, you will want to know what the hell to do of the commands (or you can just paste and run it like if you trust it, but it very dangerous).

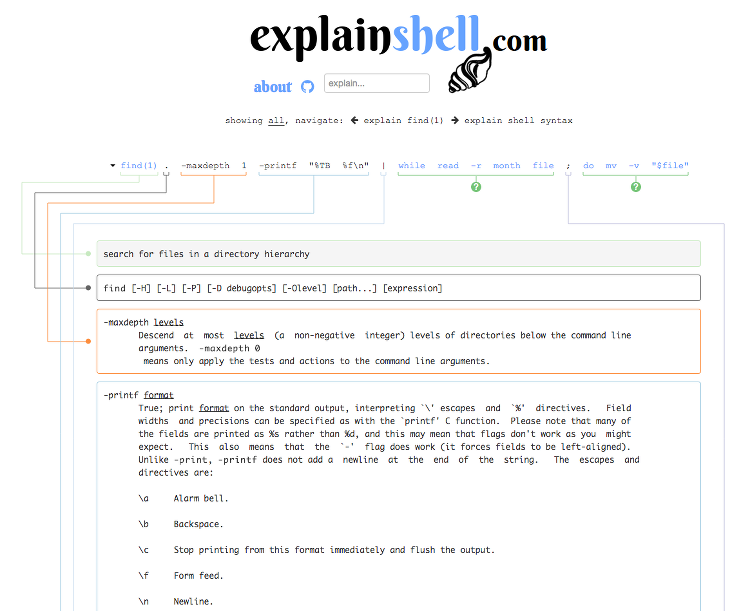
So let me show you a website named http://explainshell.com/. It can help you to understand a complicated shell command quickly.

If you got a complicated, weird, TL;DR shell command, and want to understand what the heck it’s doing, like this one

find . -maxdepth 1 -printf "%TB %f\n" | while read -r month file ; do mv -v "$file"

Just paste it to explainshell and you will get a clear ui for all explanation of combined command, like on the attached screenshot.

explainshell

11 September 2014

Deploy current branch

with capistrano

From day to day we deploy arbitrary branches to our staging server for testing. During deployment, we need to specify which branch we intend to deploy. In our deploy.rb we have something like

set :branch, fetch(:branch, "develop")

So we can

cap staging deploy -s branch=feature/my-feature-branch

But it’s annoying to copy the branch name using mouse. Instead, we add this alias to our .bashrc file:

alias cb="git rev-parse --abbrev-ref HEAD"

Next time when we deploy your current branch, simply use:

cap staging deploy -s branch=`cb`

(note the backtick surround cb)

Then you will deploy the branch you are currently working on.

10 September 2014

Pretty json

on the commandline

JSON prettifying is a reccurent topic, every coder needs it to keep some sanity. My way to do it has been something like this for a while:

ruby -rjson -ropen-uri -rawesome_print -e "ap JSON.load(open('http://jsonip.com/'))"
{
       "ip" => "59.115.120.166",
    "about" => "/about",
     "Pro!" => "http://getjsonip.com"
}

because when you are rubyist everything can be solve with ruby, obviously.

But well, then one day I did

pip install pjson

and then

curl -s http://jsonip.com | pjson
{
  "Pro!": "http://getjsonip.com",
  "about": "/about",
  "ip": "59.115.120.166"
}

Faster, easier, happier.

10 September 2014

Console columns

for better readability

When you live in your console, it’s always good to find ways to stay there. The column command was recently brought to my attention by https://sysadmincasts.com/episodes/36-cli-monday-column-and-tr and despite years of console life, godamn I was unaware of this simple tool.

It is very useful for displaying csv files in a readable way, for example:

$ head members_export_0bfc48c38f.csv
LATITUDE,LONGITUDE,CC,REGION
24.7798,120.93,TW,HSZ
52.0927,5.1158,NL,UT
25.0389,121.509,TW,TPE
47.6836,-122.122,US,WA
24.1403,120.682,TW,TXG
37.4055,-122.078,US,CA
26.1405,-80.1738,US,FL

yuck. Let’s prettify it.

$ head members_export_0bfc48c38f.csv | column -t -s,
LATITUDE  LONGITUDE  CC  REGION
24.7798   120.93     TW  HSZ
52.0927   5.1158     NL  UT
25.0389   121.509    TW  TPE
47.6836   -122.122   US  WA
24.1403   120.682    TW  TXG
37.4055   -122.078   US  CA
26.1405   -80.1738   US  FL

ohh, my world just changed!

09 September 2014

Nested fields inside table

with fields_for

Render nested fields inside a table, say have code

<table>
  <%= f.fields_for :tasks do |task_form| %>
    <tr class="fields">
      <td>
        <%= task_form.text_field :name %>
      </td>
      <td><%= task_form.link_to_remove 'Remove' %></td>
    </tr>
  <% end %>
  <tr>
    <td><%= f.link_to_add 'Add', :tasks %></td>
  </tr>
</table>

After render, outside each tr there will a additional hidden field with value of task id, Rails add f.hidden_field(:id) after the rendered field_for block. In order to make this hidden field inside each tr, we can pass option include_id: false to fields_for, and add hidden id field manually, so now our code becomes

<table>
  <%= f.fields_for :tasks, :include_id => false do |task_form| %>
    <tr class="fields">
      <td>
        <%= task_form.hidden_field :id %>
        <%= task_form.text_field :name %>
      </td>
      <td><%= task_form.link_to_remove 'Remove' %></td>
    </tr>
  <% end %>
  <tr>
    <td><%= f.link_to_add 'Add', :tasks %></td>
  </tr>
</table>

it’s much better.

ref http://apidock.com/rails/ActionView/Helpers/FormBuilder/fields_for_nested_model