26 June 2014

Clipping mask

in photoshop

Use layer shape to be the mask.

  1. Create a layer and fill with color or import image to it.
  2. Select the layer you created and make sure it’s on the top of the mask layer
  3. select Toolbar > Layer > “Create Clipping Mask”

This way you can easily switch colors, or manipulate clipped image.

image 1

26 June 2014

Knife remote command

when working with chef-server

Recntly we switched from chef-solo to a chef-server setup on our infrastructure, a good occasion to refactor our recipes to better practices. I spent some time figuring out how to replace the fabric scripts I had for remote execution of actions on various servers, by using a knife plugin. That way I can just use knife abilities and don’t need fabric anymore.

So I created a new file in .chef/plugins/knife/ named apt.rb for a test:

require 'chef/knife'

module KnifeOpenvpn
  class Apt < Chef::Knife

    banner "knife apt <update|upgrade|simulate> <nodename>"

    deps do
      require 'chef/knife/ssh'
      require 'chef/node'
      Chef::Knife::Ssh.load_deps
    end

    def run
      if name_args.size == 2
        command_arg = name_args.shift
        server = name_args.shift
      else
        ui.fatal "Syntax: knife apt <update|upgrade|simulate> <nodename>"
        ui.fatal "Where <nodename> is a node name."
        exit 1
      end
      command = case command_arg
                when 'update'
                  'update'
                when 'upgrade'
                  '-y upgrade'
                when 'simulate'
                  '-y -s upgrade'
                end
      knife_ssh(Chef::Node.load(server).ipaddress, "sudo apt-get #{command}").run
    end

    def knife_ssh(server, command)
      ssh = Chef::Knife::Ssh.new
      ssh.name_args = [ server, command ]
      ssh.config[:ssh_user] = Chef::Config[:knife][:ssh_user]
      ssh.config[:ssh_port] = Chef::Config[:knife][:ssh_port]
      ssh.config[:identity_file] = Chef::Config[:knife][:identity_file]
      ssh.config[:ssh_gateway] = Chef::Config[:knife][:ssh_gateway]
      ssh.config[:manual] = true
      ssh.config[:host_key_verify] = Chef::Config[:knife][:host_key_verify]
      ssh.config[:on_error] = :raise
      ssh
    end

  end

end

Then I just run a knife apt simulate my-server to execute a apt-get -s -y upgrade on the my-server client node. Pretty useful. But I guess that’s only a beginning, I should extend it to run on various nodes at the same time and maybe inside threads or something like that, to match the fabric power.

26 June 2014

Test true

in activerecord

I had to a case where I need to test a boolean value that can be [1,'1'] (in mysql), and I found the better way to do this by using ActiveRecord::ConnectionAdapters::Column::TRUE_VALUES to detect it, rather than testing the literal value.

Api doc says

ActiveRecord::ConnectionAdapters::Column
An abstract definition of a column in a table.

Constants
FALSE_VALUES = [false, 0, '0', 'f', 'F', 'false', 'FALSE'].to_set
TRUE_VALUES = [true, 1, '1', 't', 'T', 'true', 'TRUE'].to_set

It’s much better to abstract the boolean because backends can store it differently (for example sqlite3 uses t and f).

26 June 2014

Left marginal

for css positionning

In this short tip from Roman, we will see the simple but useful CSS Pattern called Left Marginal. It helps to position an item to the left of the main content and is handy when styling additional headers etc.

The code is quite short:

%h1 Main Header
%div.left-marginal
  %div.marginal-heading Left Heading
  Main Content<br>
  and more text

CSS:

.left-marginal {
  position: relative;
  margin-left: 100px;
}
.marginal-heading {
  position: absolute;
  left: -100px;
  top: 0;
  margin: 0;
  width: 90px;
}

This code puts Left Heading into the margin of the main content div. The idea is trivial, but tricky to guess, so, using it knowledgeably would improve the application style.

See the Pen jkGEC by Mose (@mose) on CodePen.

26 June 2014

Photoshop add paper sizes

for larger canvas

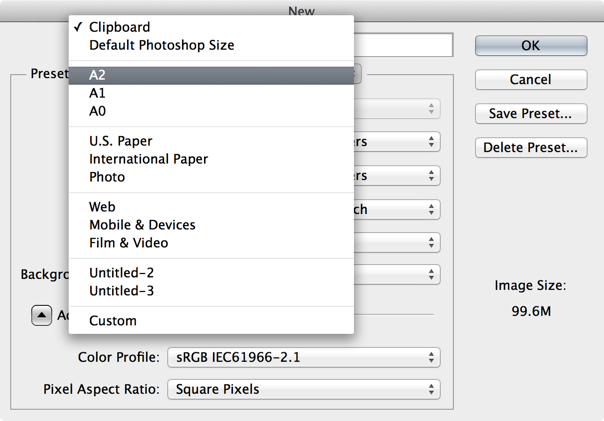
For example, the largest international paper size of A series in photoshop is A3

image 1

To add A2, A1, A0, we can set custom size and ‘Save Preset’.

image 1

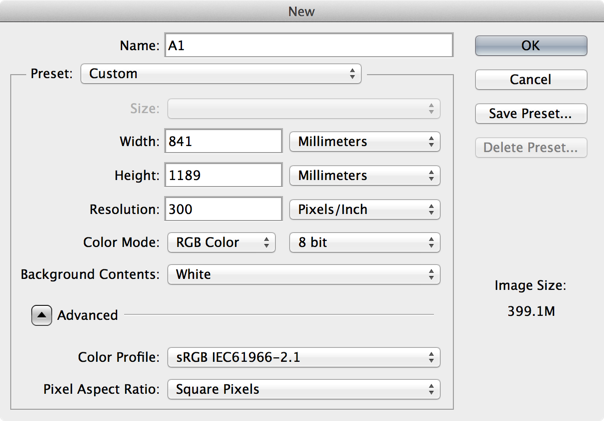
But it looks not good because photoshop don’t know they are under International Paper A Series actually.

image 1

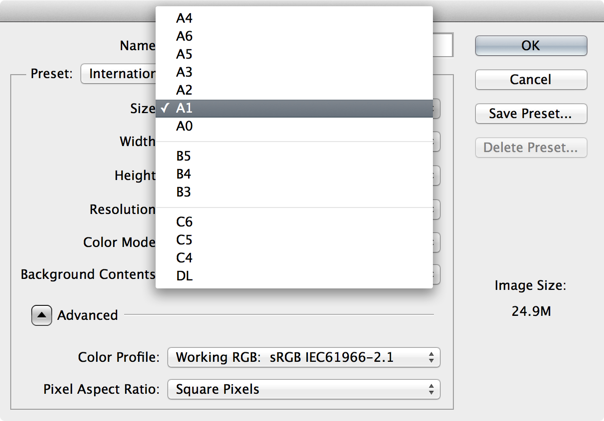
That’s better, right?

image 1

To do this, open the file ‘Default New Doc Sizes.txt’ under ‘Adobe Photoshop CC/Locales/en_US/’ and search ‘A4’, you will find:
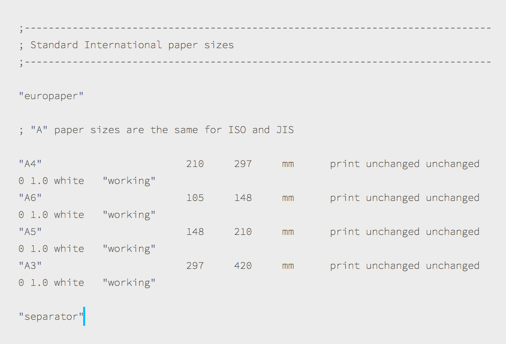
image 1

Copy, paste, edit

image 1

Quit & relaunch photoshop, that’s it, you can add more missing size now.

p.s. the location of ‘Default New Doc Sizes.txt’ depends on what version and lauguage of Photoshop we’ve installed

26 June 2014

Array literals

and interpolation

When declaring an array of string, rather than declaring it literally as:

["apple", "orange"]

We can do it as:

%w(apple orange)

This saves typing the quote and comma. This is pretty well known.

What may be less known is that there is a difference between using %w() and %W(). The big one enables interpolation. For example

%w( #{1+1} )  #=> [ "\#{1+1}" ]
%W( #{1+1} )  #=> [ "2" ]

Also, we know ruby don’t have character as variable type, it has only string. But you can declare a one character long string by using

?z  #=> "z"

This is sometimes useful in case statements (and saves one keystroke, woohoo).

26 June 2014

Vim paste buffer

to paste again and again

When you use vim, if you select some text and replace others, it is annoying the paste buffer is overwriten by the removed text. You cannot paste again and again. This config is helpful to avoid this situation (put it in ~/.vimrc)

function! RestoreRegister()
  let @" = s:restore_reg
  return ''
endfunction

function! s:Repl()
  let s:restore_reg = @"
  return "p@=RestoreRegister()\<cr>"
endfunction
vmap <silent> <expr> p <sid>Repl()

additionnal comment from hSATAC

It may not work well if you have set clipboard=unnamed, in which case you can use:

function! RestoreRegister()
  let @" = s:restore_reg
  if &clipboard == "unnamed"
    let @* = s:restore_reg
  endif
  return ''
endfunction
19 June 2014

Ruby at_exit

for clever process termination

Here is a easy way we can ask ruby to execute something when a process is terminated. This applies mostly (but not only) to command-line code and daemons. Just use ‘at_exit’ in our process.

for example:

def run
  at_exit do
    puts "I am terminated, save me quickly"
  end
  loop {}
end

When I execute run and for some reason the process is (ex: ctrl+c), it will execute the codes in the block of at_exit

This trick helped us to stop some sub-process when stopping our message queue consumer daemon :)

19 June 2014

Less first

for safer file examination

When working on a remote server, I use less instead of tail or vi to check files, the more I can.

filter

  • with &searchstring it will hide all lines not matching searchstring, like a very simple grep from the console
  • just & with nothing to get back to full view

edit file

  • when in less /etc/hosts if I find out I need to edit it I just type v it opens it in vi
  • when you quit the editor you are back in less

follow mode

  • when in less production.log, if you want to follow incoming changes type F it will become like a tail -f but it keeps the syntax highlighting that was made with a / search
  • when in follow mode with F you can ctrl-c any time and examine the new stuff
  • note that if you are in filter mode the follow respects it (like if you did a grep something/var/log/auth.log | grep 'Invalid user')

multifiles

  • you can open several file and navigate like in vim with :n and :p
  • when less is open you can open a new file with :e

call options inside less

  • you can call any launch option from inside less, one I use often is -S that will enable/disable wrapping of long lines, very useful when parsing web server log files
  • to disable/enable search highlighting just -G
  • any other launch option can be called from inside less, pretty convenient
19 June 2014

Footer in PrinceXml PDF

with some touch of css

In this tip, we are going to add a custom footer to a PDF document, generated using Prince XML. Suppose we want to have a school name and logo in the left bottom corner, and a page number in the right bottom corner. We need to include the next CSS which declares it:

@page{
  @bottom-right {
    content: flow(right-footer-data);
    white-space: nowrap;
  }

  @bottom-left {
    content: flow(footer-data);
    white-space: pre-line;
  }
}

.footer-data {
  flow: static(footer-data)
}

.right-footer-data {
  flow: static(right-footer-data)
}

As you can see, two footers are declared: footer-data is the left one, and right-footer-data is the right one. Then in the template we write within the first page body:

%div.page{ :style => 'page: portrait;' }
  .footer-data
    = image_tag path_to_school_logo
    My Cool School Name
  .right-footer-data
    .fr
      %span{ :style => 'content: "Page " counter(page) " of " counter(pages);' }

This footer will appear on every page, counting the pages automatically.